lauantai 27. helmikuuta 2016

Maru OS turns Nexus 5 into a Desktop Linux computer

Maru OS is a custom version of Android which lets you run Android on your Nexus 5 and at the same time Linux on your HDMI monitor via Slimport adapter. Sadly enough, I happen to own Nexus 4 only. No screenshot, no go at the moment, sorry. Let's hope Maru OS will support more phone models in the future.

While waiting off I went and purchased a Slimport adapter (see pictures below) at Verkkokauppa.com outlet for 12 €. At the moment it's possible to mirror the screen of my phone and use TV as a second monitor. What did I do? I attached a HDMI cable to my TV. Next Slimport adapter to HDMI cable and lastly Nexus 4 to Slimport adapters micro USB port. Suddenly the screen of my phone showed up on TV. There was no need to change any settings in Android.

Why is Maru OS so important and interesting project? Because of Microsoft. They have their Continuum going on. It's possible to turn Windows phone into PC. With help from Maru OS assorted Android phones will be able to do the same.

In case you got interested, please read through how to flash your phone. All the information you have will be wiped. Remember you are doing it at your own risk.

Mirroring

Slimport adapter ends

Slimport adapter has an extra port for power,
however I didn't need it

An old Amstrad PPC512 - you can charge it's batteries with solar panel

Picture this:

  • Amstrad PPC512 portable PC
  • NEC V30 processor
  • One 720 KB floppy drive
  • 512 KB of RAM
  • MS DOS 3.3 on one floppy disk
    • Maybe FreeDOS is an option?
  • LCD screen (no backlit)
  • Full size keyboard
  • No hard disk

What can you do with that sort of hardware and software? Well, if you never had such a PC back then, it might be hard to imagine. As a former owner of Toshiba 1000 (I think it was 1000...) IMHO there is a lot you can do with hardware like that!

In addition, best is yet to come! As Amstrad has an LCD with no backlit, not that much power is needed to run this beast! You can use ten C-size alkaline batteries (10 x 1.5v). If you happen to own a solar panel chances are you can charge batteries over and over again. This goes to show Amstrad is a true portable off-grid computer... at least during the summertime :D.

I can't fire up my Amstrad just yet. Floppy drive is broken (look at the pic below). It needs to be replaced. No substitute around, I'm afraid. Once Amstrad is back in business I let you know how it is doing.

Replacing 720 KB floppy drive

There is room and wires for another floppy drive, hmm...

torstai 25. helmikuuta 2016

Raspberry Pi Zero got connected via an old homepna USB adapter

Raspberry Pi Zero is a really tiny computer with ARM-based processor and 512 MB RAM. But how to get connected? You probably  want to update your operating system (in my case Raspbian) and surf via web browser on the Internet.

My solution is an old homepna adapter from A-Link. I found it at local flea market with price tag 1 €. The good thing is all I need to do is to attach adapter and start to use the net. Raspbian is connected immediately. Downside is the size of the adapter. However once connected you can fetch drivers for another adapter like A-Link USB54 (see picture below). After that Raspi Zero is not wired but working via wifi and can be placed anywhere.

It's a big one... but it works out-of-the-box

It's an A-Link adapter

Wireless adapter from A-Link

keskiviikko 24. helmikuuta 2016

My Raspberry Pi Zero arrived - finally!

At last! Raspberry Pi Zero has arrived. I received mine today. Only an hour or two from unboxing Zero was running the latest Raspbian. Here's my checklist for the first time boot:
  • Download, unzip and burn the latest Raspbian on an 8 GB micro SD card
    • In Windows use for example Win32DiskImager as admin
    • In Linux use dd as root
  • Find the following hardware:
    • Mini HDMI - HDMI cable 
    • Micro USB charger
    • OTG cable (micro USB - female USB)
    • A hub with at least two free ports
    • Keyboard and mouse
  • Combine hardware and fire up Raspi Zero!
  • Run raspi-config as root and fine tune Raspbian
    • Define for example your screen memory
    • Change keyboard layout if necessary
  • Wait a minute! No access to Internet? Hold your horses! There is a workaround in the back of my mind. I will write about it later.
Getting Raspberry Pi Zero up and running is easy if you are familiar with earlier versions of Raspi computers. Please pay attention to the fact that Zero is not as powerful as Raspberry Pi 2.

I'll be back with more information later! Stay tuned for more!

Raspi Zero is the tiniest computer I've ever had

3D-printed chassis for Raspi Zero

Raspi Zero running - green LED on the left is on

sunnuntai 14. helmikuuta 2016

Two Linux boxes: an ancient PC vs Raspberry Pi - pros and cons

Oldies but goldies

I have a bunch of not old but ancient PCs lying around. One of them is AMD K6-2 with 128 MB of RAM and 6 MB HD from year ~ 1998. Since this PC is capable of running the latest Debian 8 I decided to give it a go. Old ISA network card was removed and a PCI USB card with A-Link USB wifi dongle mounted. That's how an old PC got a new life.

Will Raspberry Pi take over?

So how does Raspberry Pi, an SBC (Single Board Computer), which I like a lot compare with an old PC? Here is my list of the pros and cons:

Old PC:

Pros:

+ still going strong and running the latest Debian Linux (in command line mode only) so why buy a new PC when you can get it once and use forever!
+ hardware is well known and documented, it's easy to get help if needed, spare parts can be found
+ chassis has enough space for almost any piece of hardware
+ when PC is up and running you really can hear it!
+ not running the latest Windows ;D

Cons:

- an old PC consumes a lot of energy
- noisy (what if I had 10 of them running at the same time!?)
- chassis needs a lot of space at home
- BIOS supports booting from CDROM only

Raspberry Pi

Pros:

+ runs Raspbian Linux (i.e. Debian for Raspi)
+ it's tiny compared with an old PC and it'll get tinier (Raspi Zero!)
+ it doesn't need that much energy to run
+ no noise!
+ a lot of users on the Internet, it's easy to get help if needed
+ GPIO pins which takes computing to another level!
+ not running the latest Windows ;D

Cons:

- you only get Raspi when purchasing one, no chassis, nothing
- you can't update the hardware, 1 GB of RAM is enough!
- will Raspi run after 18 years?
- slower than your smart phone hardware, for hobby purposes only
- not replacing your present Desktop

My verdict

An old PC is like Volkswagen Beetle from the sixties - buy once keep forever! However show must go on. Raspberry Pi is my choice because we are living IoT-age. You can't place an old PC behind your flat TV, can you ;D? So, the first price goes to Raspi and not that far away behind an old PC.

My AMD K6-2 from year 1998

an old ISA NIC

Raspberry Pi 2 GPIO pins

1st generation raspi and an old Casio TV as monitor

Raspi is an SBC (Single Board Computer)


Testing ChromiumRPI 0.3 for Raspberry Pi 2

Chromium OS is like Chrome OS, you know, browser-only operating system. You must have seen Chromebooks with Chrome OS inside. From now on it's possible to turn your Raspberry Pi 2 into a "Chromium Book".

So, what is the exact difference between Chromium OS and Google Chrome OS? Let's see what Chromium OS Frequently Asked Questions has to say:
  • "Chromium OS is the open source project, used primarily by developers, with code that is available for anyone to checkout, modify, and build.
  • Google Chrome OS is the Google product that OEMs ship on Chromebooks for general consumer use." Source: https://www.chromium.org/chromium-os/chromium-os-faq
At the moment, the image of ChromiumRPI for Raspberry Pi 2 is available via the following link: 
Let's hope this project gets a proper home page in the future. I did find a Github page but I think it's not enough.

Extract the zip-package and burn the image on an SD card. If you face problems with the extension .BIN simply rename it to .IMG. Use Win32DiskImager (in Windows) or dd (in Linux).

In order to make Chromium OS work you have to download the file /etc/chrome_dev.conf from here: http://www.mediafire.com/view/3xc1rbrij0ld2f8/chrome_dev.conf. Open your File manager in Linux as root and find root partition. Then replace the old chrome_dev.conf with the one you downloaded. Handy, eh?

If you can't sign in try Control + Alt + F2. Then, login: chronos and password: chronos. Type sudo su and enter the password chronos again. Finally, type date -s “01/21/16“. 

I have no api-keys. My Gmail account won't work until I have api-keys. However,  I was able to login as guest, change language to Finnish and browse the web via ethernet.

If Chromium OS doesn't boot without errors then I suggest you wait for the next version 0.4 which will be available very soon - only a week from now.

My verdict: Let's wait a while. ChromiumRPI will get more mature in near future (version 0.4 will be released soon).


Chromium OS Desktop - looks similar to Chrome OS

Raspi 2 at work running
Chromium OS!

perjantai 12. helmikuuta 2016

How to enable Raspberry Pi experimental OpenGL driver

The latest Raspbian brings us an experimental OpenGL driver. In case you want to give it a try, do the following:

Open terminal and type in:
  • sudo raspi-config
Browse to Advanced Options -> GL Driver -> Enable. Reboot your Raspi.

Try Oolite to see OpenGL driver in action:
  • sudo apt-get install oolite
Fire up Oolite:
  • oolite &
PS Experimental OpenGL driver is for Raspi 2 only!

My Raspi2 trying OpenGL driver for the first time

sunnuntai 7. helmikuuta 2016

SBCs are for the hobbyists, not for the masses?

Single Board Computers (i.e. SBC) are very popular among hobbyists; inexpensive and versatile. There is no project which can't be done using these tiny little miracles. So why isn't everyone using SBCs?

There are many answers:

  • First off, SBCs run Linux. This is something people are not used to. Most of us own a laptop with Windows, Apple's OS X or Chrome OS from Google inside. Linux Desktop is a rarity.
  • Secondly, Raspberry Pi has done a good job and is offering not just inexpensive hardware but easily installable software. However there are manufacturers which haven't. For example Hardkernel, a company behind Odroid C1, has been competing against Raspberry Pi for some time. In the beginning there was not that stable Linux around for C1. Users trust is achieved by supporting hardware.
  • The third challenge is poor performance of the SBCs. If a computer costs 5 $ it's not as quick as your laptop. No way. The tiniest SBCs only have 512 MB of RAM. That is something we last saw ten years ago in budget laptops.
  • However, you can see things differently. Read on...
For the time being, not everyone of us is using an SBC. But things can change. 80 % of all phones and tablets run Android which has Linux in the bottom of the operating system. There you have it! Linux is already around! Why not run Android in an SBC?

In the future you might run an SBC without knowing it. It's predicted tiny computers and micro controllers will be everywhere and they will get even tinier than today. Embedded systems don't need that much memory or fancy graphical interfaces. Next time you buy a fridge there probably is an SBC inside.

We have been living the stone age of computers for the past 30-40 years. It's time to move on to the next era when not just hobbyists but all of us use SBCs daily.

My Raspberry Pi meets an old TV from Casio

lauantai 6. helmikuuta 2016

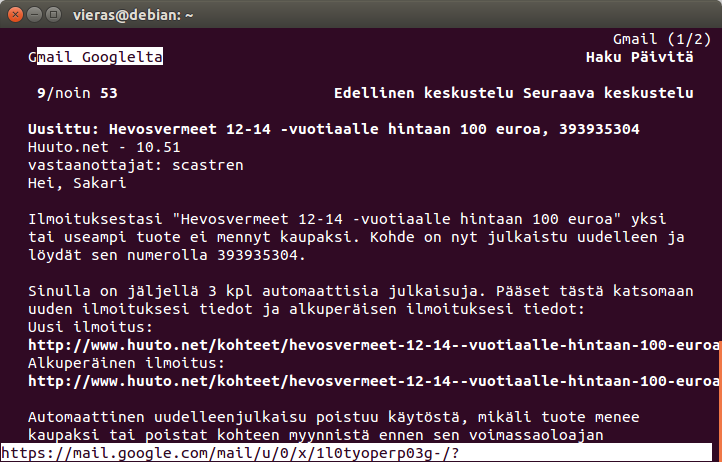
Read your Gmail messages in CLI Debian Linux with Elinks web browser

If you are one of those command line interface Debian Linux lovers and would like to read your Gmail messages why not give Elinks text-only browser a go!

Setup Elinks in Debian Linux as root:

  • apt-get install elinks

Go on as a normal user. Fire up Elinks:

  • elinks

Type the following URL:

  • m.gmail.com

Navigating in Elinks is, eh, different. First off, I advise you to calm down ;D. Next, move forward with arrow down key. Once you get to the fields where login and password are asked push enter and type the information needed (and another enter). Not very easy? Don't worry. Next time you want to read your email you'll notice that you are already in. So try to find Log out as well! It's in the end of the page.

One more valuable key! if you want to take a deeper look at Elinks browser try Esc. It reveals menus which you can browse with enter and arrow keys.

And hey! Running Elinks via ssh might not be very good idea. Navigating Elinks is not the same. At least that's how it turned out in my case.


perjantai 5. helmikuuta 2016

Turning an ancient wired PC running Debian 8 to a wireless one

An ancient K6-2 processor with 128 MB of RAM. Not bad! The latest Debian Linux 8 (Jessie) runs fine on that sort of hardware. The problem was the old ISA network card which Debian didn't know how to handle. Me neither. Now what?

With a spare PCI bus USB-card and an A-Link wifi dongle my old PC got a new life. Both devices are compatible with Debian. USB card was recognized automatically. A-Link USB wifi dongle needed an extra non-free software package. Take a look at my earlier post to see how to make A-Link work on Linux.


USB card and A-Link USB wifi dongle

Time for old ISA network card to go

nmcli - connect to wifi from command line

Ever wondered how to connect a Debian Linux with command-line-interface-only to your wireless network? A tool called nmcli does the job. This is what you need to do:

Install network-manager. nmcli tool follows with the package. You need to type the following command as root:

  • apt-get install network-manager

Go on as root. Check that nmcli is there:

  • which nmcli

Setup your wireless connection:

  • nmcli d wifi connect <your wifi SSID> password <your wifi password> iface wlan0

Check out your wireless. You can see the <ID> of your connection in the left side of the screen under "NAME":

  • nmcli c

Disconnect your wireless network:

  • nmcli c down id <ID>

Connect to your wireless network:

  • nmcli c up id <ID>

The commands above help your Debian Linux to to get in touch with your wireless network. Keep in mind you have to turn your connection on by hand every time you boot your Debian.

ssh connection to my old PC (from year 1998)
with the latest Debian 8 (Jessie) installed


lauantai 30. tammikuuta 2016

Hardinfo tells what your Linux-box has eaten

Hardinfo is a handy tool which inspects your hardware and reports both in graphical and command line mode.

Install Hardinfo in Ubuntu 14.04 LTS:

  • sudo apt-get install hardinfo

Run Hardinfo:

  • hardinfo &

If no graphical user interface is available you can run Hardinfo from command line:

  • hardinfo -r -f html > report.html

Report can be seen for example via text-only www-browser Lynx which you can install by typing:

  • sudo apt-get install lynx
Open Lynx:
  • lynx
Letter g stands for Go. So choose g, type in report.html and push enter:
  • g
There you have it!


Hardinfo graphical user interface

Hardinfo report opened in Lynx-browser


perjantai 29. tammikuuta 2016

How to install Ino - a command line Linux toolkit for working with Arduino hardware

Ino - an old PC with one USB 1.1 port is enough for your Arduino!
Ino is a command line toolkit for working with Arduino hardware. You can install it on Linux and use CLI (Command Line Interface) to compile and transmit code over to your Arduino hardware. Text editor is up to you. There are many editors to choose from; vi, vim, pico, nano etc.

Setup
First off, install python pip package manager. I'm using Ubuntu Linux 14.0.4 LTS:
  • sudo apt-get install python-pip
After that, go on with Ino install:
  • sudo pip install ino
I suggest you install the command tree which is needed later (if you decide to read quickstart):
  • sudo apt-get install tree
Finally, check out if Ino is there:
  • which ino
How to go on? Click the following link: http://inotool.org/quickstart 


tiistai 26. tammikuuta 2016

Old school mounting of a USB stick in Debian

Picture this:
  • an old Pentium PC, strong enough to run the latest Debian 8
  • no GUI (Graphical User Interface)
  • no automount of a USB stick
Let's try the "old school". Use the following commands:
  • grep "SCSI removable disk" /var/log/messages
    • can you find [sda] or [sdb]? I got [sdb].
  • mkdir  ~/myflashdrive
    • i.e. create a folder in your home directory
  • su
  • mount -t vfat -o rw,users /dev/sdb1  ~/myflashdrive
  • exit
Now you can enter ~/myflashdrive. cd to the directory you created earlier.

When not needing the stick anymore move away from the folder ~/myflashdrive
  • cd ~
Unmount your USB stick:
  • su
  • umount ~/myflashdrive

Formatting a floppy (360 KB) in an ancient PC

Watch out! You are about to read how to format an ancient floppy disk. Make a U-turn now or go on reading. You have been warned ;D !

I need an operating system for my old PCs. There are many of them up in my fathers attic waiting for a restart!

First thing to do was to get those floppies. How lucky I was when a gentle person donated me a box with 10 unused BASF floppies inside! Yippee!

Next those floppies needed some formatting. Again, Mr. Fortuna appeared making my task easy. An old 286 PC, which I own, already had MS-DOS 6 inside! All I needed to do was to start formatting. Off I went and typed in the following command: format a: /F:360. That's it!

Now I have the floppies ready for the next round. There is a free version of DOS available. And the name is... FreeDOS! What's best, ready made floppy images can be downloaded here: http://jorisvr.nl/freedos.html . I guess an application called rawrite can do the trick and write those images on floppies. Not 100 % sure though.

You do remember those days of DOS, don't you! Hmm, some 30 years ago. I couldn't afford a PC back then, though. However there was Commodore 64 with an external floppy drive which was familiar for me. So stay tuned for more (vintage) information and keep on reading my blog.

PS One of my friends hinted me my 5,25" drive in 286 PC is 1.2 MB compatible. So when formatting floppies in 360 KB size the resulted floppies might be incompatible or at not that good. We'll see...


Place Linux inside Dropbox and run it from there

You can easily run CLI (Command Line) driven (i.e. no graphical Interface) Linux which is placed in Dropbox. No matter whether you are using Windows, OS X or Linux. So, let's get started.

  • First off, get yourself Dropbox account. After that install Dropbox on your Desktop. You can find install packages on Dropbox site.
  • Download a small Linux distribution called Levinux. Zip-package is about 20 MB in size.
  • Extract Levinux and place it in Dropbox.
  • Now, depending on which operating system you are using you can start your Levinux. How?
    • If using Linux like me, open terminal, change to the directory where Levinux is and type in the following command: ./LinuxLevinux.sh. After that Levinux fires up.
    • In case you have Windows all you nned to do is double-click a file WindowsLevinux.vbs. (I haven't tested that though!)
    • OS X? I suggest you look at the video on YouTube. Running Levinux on OS X should be pretty straight forward. I have no access to that operating system at the moment.
Let Levinux boot. Choose number two (look at the screen capture below).
  • Login: tc
  • Password: foo
From now on you can start to study Linux commands. There are plenty of them. Find your favourite Linux guide on the Internet. It's never too late to migrate to Linux!

But wait! There is more! Levinux is also a small web server. You can place your HTML-pages inside a folder called htdocs and use your favourite web browser to preview them. How? SSH Levinux and transfer desired files to folder htdocs. Yes, i can understand that. But how do I do it? I'll tell you later. Stay tuned for more!


keskiviikko 20. tammikuuta 2016

DVB-T stick on Linux still rocks!

Many national TV stations in Finland are available both via internet and DVB-T networks. Every now and then IP network of my Internet operator is down for, God knows, what reason. In those cases DVB-T stick makes my day.

When choosing a DVB-T stick for Linux, pay attention to the name of the manufacturer and the model of the stick. Google around before you buy anything. Try to find information which hints whether your stick works on Linux "out-of-the-box". What does that mean? Some sticks are so well supported Linux already includes the driver needed. That way the stick is automatically recognized. Attach the stick, open terminal and on command line type in the following command:

dmesg

In the end of the messages generated by dmesg you'll find if Linux sees your DVB-T stick. If you look at the photos below you see see two very well supported DVB-T sticks. Many Linux distributions support them. There is another useful command:

lsusb

The command above lists all USB devices of your PC. If lsusb tells you DVB-T stick is there chances are you'll be watching TV in no time!

There are many DVB-T clients to choose from. One of the easiest IMO is Kaffeine which finds the channels and shows subtitles (in Finland). Not all apps do the same! Setup Kaffeine in Ubuntu 14.04 LTS:

sudo apt-get install kaffeine

It took some time for me to figure out how to make Kaffeine look for TV channels. Once it was done I had reached my goal. I can enjoy TV series and don't need to worry if internet is down.

What if you are living in an area which has a cable TV connections only? No problem. Find a DVB-C or hybrid stick (DVB-T + DVB-C). They might cost a little more than DVB-T sticks. Try dmesg and lsusb commands the same way as with DVB-T sticks.


Anysee E30 and Cinergy Terratec T2
are supported out-of-the-box on Ubuntu Linux

Indoor antenna

No extra power supply needed - USB2 is enough

Kaffeine finds channels and shows
subtitles in Finnish


perjantai 15. tammikuuta 2016

RemixOSforPC - run windowed Android on an x86 PC

Are you fancing how Android and Chromium OS combined will look like? No need to do that anymore! Download RemixOSforPC, write the ISO-image on at least 8 GB USB 3 stick and boot your PC. As a result a windowed Android will show up on your screen. If nothing happens, don't get bothered, you are using alpha software!

My Dell Latitude E6420 did it's duty quite well. With USB 2 only it took some time before the Desktop was there. After that everything worked nicely. Bear in mind only limited set of software was available. No Play store as default (available via XDA). No download links for extra software. Not all hardware is supported. Besides, no setup on hard disk at the moment, USB stick only.

RemixOSforPC has very little to do with Google. It's a Chinese project as far as I know. If you are feeling brave, give RemixOSforPC a go!

KEEP IN MIND YOU ARE USING THIS SOFTWARE AT YOUR OWN RISK!

Dell Latitude E6420 running RemixOSforPC Alpha

maanantai 4. tammikuuta 2016

Download your favourite flavour of Ubuntu for Raspberry Pi 2 - torrent only

If you are looking for an operating system for your Raspberry Pi 2 take a look at Ubuntu Pi Flavour Maker. There are five different Ubuntu-based community driven distributions to choose from. Click your favourite flavour of Ubuntu below and save the torrent file on your hard disk:
Next you need to download the install image via torrent network. Install Transmission (on Ubuntu):
sudo apt-get install transmission
Fire up Transmission, click open and choose torrent file. Your xz-compressed image starts to download.

To prepare a bootable USB stick use your favourite graphical app or command line (see those three lines below):
sudo apt-get install gddrescue
unxz ubuntu-minimal-15.10.1-server-armhf-raspberry-pi-2.img.xz
sudo ddrescue -d -D --force ubuntu-minimal-15.10.1-server-armhf-raspberry-pi-2.img /dev/sdx
(Do not write sdx but the real address of your SD-card; sda, sdb etc.)

On Windows, use 7-zip and  Win32DiskImager.


perjantai 1. tammikuuta 2016

Year 2016 - when SBCs got tinier and more powerful

Everyone sees the future from one's own angle. For me year 2016 will show how tiny and powerful Single Board Computers can get! There is an example which shows the way to other rivals - Raspberry Pi Zero.

Although not the fastest Zero proved how quickly things are going forward. Only four years ago Raspi was first introduced. Now, Zero is one third of the size of the original Raspi. They both offer the same hardware specs. Looking forward to see some very nice surprises during the year 2016!

Original Raspberry Pi b